We will go through a fast simple example of how to plant trees using the API.
When we set up your API, we will send you 2 pieces of information: your forest ID and your API token.
There are various ways to use the API:
- 2 levels: you plant trees for your customers.Learn more.
- 3 levels: you act as a platform and plant trees on behalf of your B2B clients for their end clients.Learn more.
We will first go through the general configuration as shown below, and then show you examples of how to plant with 2 levels and the 3 levels.
配置
Step 1: Request the API Token
Request the test or live API Token. This can be done through:https://kb.www.shuinengjia.com/knowledge/api-availability
You will receive an email within 1 business day containing your bearer token and User ID. Here is an example:
Step 2: Load the API Documentation
Open our APIDocumentation. In this example, we will be running it on Postman.
Step 3: Select a species to plant
Open ourlist of projectsand select a project you're interested in. Then click on the species tab to see the species they offer.
 Once you have made your selection of the species you want to plant through the IOT, take note of the project and the species name. In this example, we will be planting the species 'Larix eurolepis' in the project 'Agroforesterie et Boisement, France'.
Step 4: Postman - Collecting the project ID
We will start by getting the list of the projects to see the ID of the project we are interested in. This will help us later get the list of the species IDs within that project. To do so, we are going to make a GET request to //www.shuinengjia.com/api/projects?status=active
Next, we can CTRL+F (CMD+F for Mac) the Body to find the project in the obtained list. We can see here that the ID of the project is 160. Take note of the project ID.
Step 5: Postman - Collecting the species ID
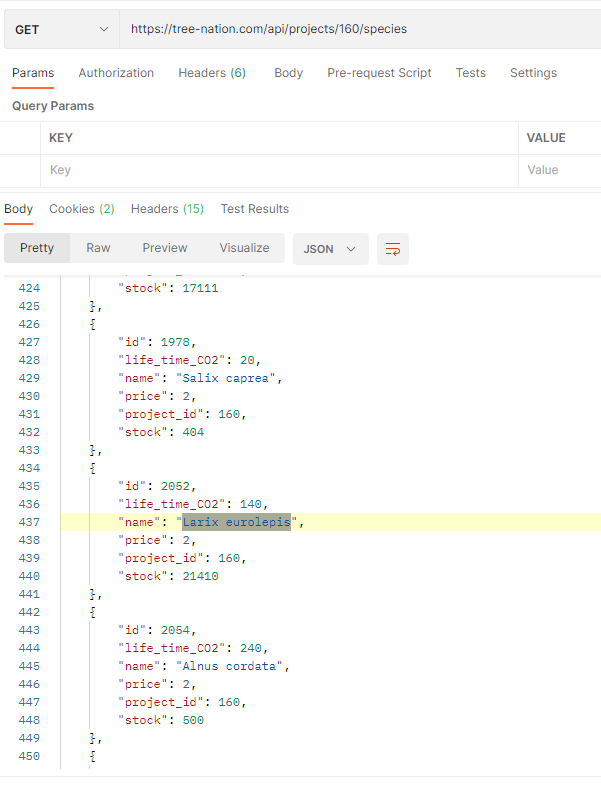
The same as Step 4, but this time we will make a GET request to //www.shuinengjia.com/api/projects/160/species

Search for the species name ('Larix eurolepis' in our case) by clicking CTRL+F (CMD+F for Mac). We can see below that the ID of that species is 2052. This is a unique ID linked to that specific project, so if another project is planting the same species, it would have a different ID. This means you will only need the species ID for the final step.
Plant trees with a 2 Levels API
In the User IOT folder (left panel), click on POST Plant.
Go to the authorization tab and select 'bearer token type'. Next, enter the token we sent you via email.

Head back to the Body tab. You will find an example of a body that is going to be sent with a POST request to //www.shuinengjia.com/api/plant.
- Set the name and email of the gift recipient.
- Set the planter ID as your user ID provided via email.
- Set the Species_id to the ID you obtained in step 5.
- 设置消息将被包含在你的树-Gift.
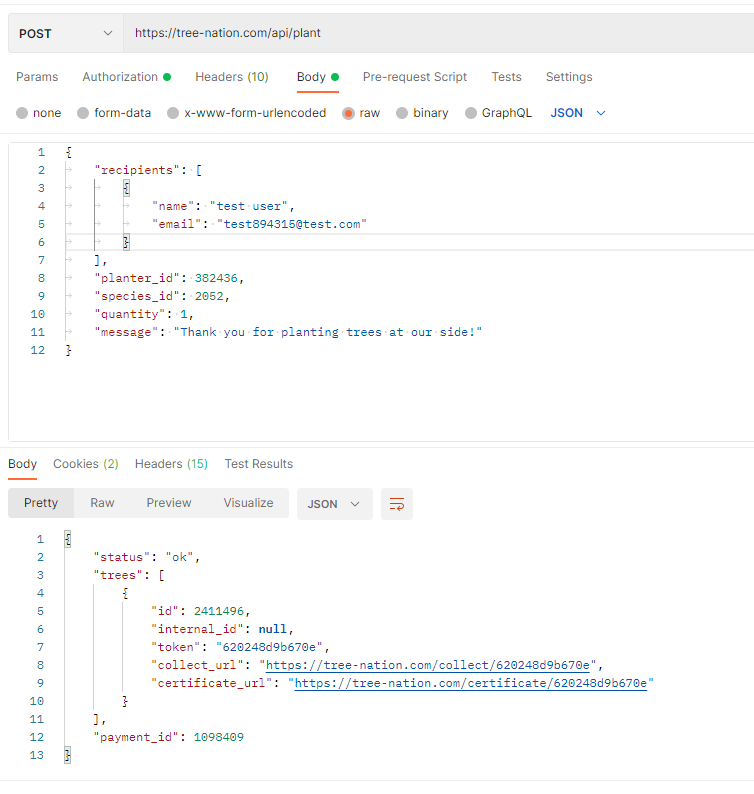 You will receive a response like the one shown above. The collect_url is the link your gift recipient will receive via email, and the certificate_url is the link to the certificate they will obtain once they have registered in Tree-Nation.
Of course, if you decide not to use our emailing system because you want to do your own communication, please let us know so that we can deactivate the emailing from our side, and you will still receive the same IOT response when planting.
Final Step: Checkyour forestto see the planted tree!
Plant trees with a 3 Levels API
Head to the User API folder and click on 'Create user'.
You will need to add the bearer token as well, so that we know who the B2B client belongs to.

Next, it is time to plant on behalf of your B2B user for his end clients. For this, we will do exactly the same steps as the 2 levels API shown above, but instead of using our own user ID, we will use the user ID of the user we created.